Create Event Blocks
Next begin creating the building blocks to add to the Matrix. The Event Block Panel creates new EBs for placement on the Matrix.
A WORD ABOUT TIMES MES requires the relative time ordering of all EBs. Investigation Catalyst automatically sequences EBs in one of two ways. If Begin times are entered, EBs is arranged in relative time order. If Begin times are not entered, they can be positioned manually and the positions re-set relative to EBs before or after the selected EB. To use the Overlap Display, either the Duration of the action, or the End Date and Time must be entered by the user. |
Use Tools Menu > New EB Panel or Command+B or select then EB icon from the Tool Bar to open the New Event Block Panel.

This window appears ready to receive user input data, in the order it should be entered.
Always enter the name of the person or object that did something, or actor. The name should identify a unique person or object with a unique name or title, number, symbol or other unique identifier. It should enable a reader to visualize the person or object from the name, or accompanying data describing the attributes the individual or object. If you don't know the name, use a "?" as a placeholder until you can find out what it is.
Investigation Catalyst adds actor names to the Actor column on the Matrix when they are first recorded in an event block. It also deletes the name if actor names are changed and no more EBs for that actor remain.
Navigating EB Panel
| Mouse | Position cursor over text box and click to begin entering text. |
| Tab | Moves cursor to next text box. |
| Shift+tab | Moves cursor to previous text box. |
| Right click | Brings up Spell Checking panel. |
| Return | Creates an EB on Matrix containing the data shown in the panel when return is pressed. |
| Click | Click on Glossary box to see glossary contents Click on Set Default box to set default to current entry. |
Data Entry Aids
Use four data entry aids:
| The Glossaries | Investigation Catalyst adds each manual entry in a text box to the Glossary for that text box, and re-sorts each glossary alphabetically after each new or revised entry. It also adds the glossary entries for imported files to the glossaries in the current file. Display glossaries by clicking on the Blue down arrow to the right of the box. Selecting any entry in the displayed Glossary window will place that entry in
the block. This helps ensure consistent entries. |
| Set Default | Click on the Make Default box to the right of an entry will set that entry in the current text box as the default for subsequent EBs, until a new entry is entered manually, or selected from the Glossary. |
| Forbidden Words | MES grammar rules are implemented by this Panel. Investigation Catalyst checks entries against a short list of Forbidden words, and warns the user if one is used. The Rules can be viewed from the Window>Rules menu, and edited from the Tools>Poison Words menu. |
| Spelling Check | Control+click or right click on a data entry box and select the preferred spell checking option. |
Data Entries
Enter new Event Block data in each of the text boxes in this Panel.
- Note: Keep in mind the size of the EBs on the Matrix, which will truncate long entries in displayed EBs, even though the full text will be captured and displayed in the EB Panel and other panels.
| Actor | Enter unique name of person or object whose action or behavior is being recorded, or ? if more data are required. No pronouns, plural names, group names. Use suffixes to distinguish individual people or objects from their group, e.g., Operator A, valve 212. |
| Action | Enter verbs describing what actor did, past tense, or ? if more data are required. Avoid forbidden words like was, did not, failed to, etc. Investigation Catalyst will flag forbidden words when they are entered, and provide an opportunity to restate entry. |
| Object | Enter additional text to complete description of what actor did, using measures where available. |
| Location | Enter where action took place or ? if more data are required. |
| Remark | Enter any remarks about the event, data needed, concerns, relationships, etc. that should be addressed before the investigation is closed. |
| Source | Enter identity of source of data used in this EB, or source key or ID. Any source mentioned should remain available and accessible as required by local law or good business practice. |
| Labels | The default label is white. If a different color is desired, click on the desired Color Block on the Label line. Clicking on a color box in the Title Box can change the color of a selected EB. |
| Begin Date | Date entries for when the EB began are in the form YYYY:MM:DD. The default is the current internal computer date. Shortcut: When the cursor is in one of the Date or Time fields, clicking on a date/time in the Time Bar will place that date/time in the active field in the Build EB Panel. |
| Begin Time | Time entries for when the EB began are in the form HH:MM:SS:OOO, using the 24 hour clock format. The application pads times with zeros if incomplete times are entered. Observed or estimated tames are acceptable entries. The application displays Times as estimated, followed by an "e" by default until user confirms them, when the e is removed. The default date/time entry is the current internal computer time. |
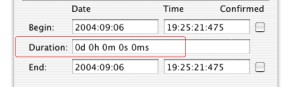
| Duration | Users can tab to and type over the default entry to enter the duration of an action, either measured or estimated, in the Duration text box:
Pressing tab key after entry is made automatically increments the begin time by the duration entered, and updates the date/time displayed in the End date/time text boxes. If the duration is a measured and confirmed value, the Confirmed check box following the End date/time line should be checked; otherwise leave the box empty to indicate that the time is estimated. See below. |
| End Date | If diuration values are not entered, user can enter the End date manually. Entries are in the same form as Begin dates. |
| End Time | Manual entries, is used, are in the same form as Begin times. |
| Confirmed | If the data and time entered are verified, click on the Confirmed box to display the entries without the estimated symbol (e). The default is unconfirmed. |
| Clear | Click on clear button to clear all entries in the text blocks, including the Date/time blocks. |
| Build Block | Press return key or click on Build Block button to place the new EB on the Matrix. Investigation Catalyst positions each new EB next to the Actor column, in the row for the actor named. The New Event Block Panel data entry blocks then clear automatically to get ready for the next entry, except for any blocks that have defaults boxes checked. |
TIP: To copy glossary names from one file to another, ensure that the two files open.
|
Previous | Next | Help Menu