- In Catalyst>Preferences>Matrix display panel, make certain Begin and End Date are checked.
- Close Preferences Panel.
- In the Matrix view, inspect the EBs that you intend to display in the Overlap View to verify that they have end date and time entries which are greater than the begin date/time entries.
- Use Window>EB Panel to view the times in table format. Sort by Begin Date to expedite the review and editing, if necessary.
- When satisfied proceed to the next step.
Use View>Overlap View to switch from the Matrix view to the Overlap View. The Overlap Scale and Range Panel appears.
The Overlap view is controlled from the Overlap Scale and Range panel. This panel provides for the selection of the scale of the overlap display and the range of the EBs displayed.
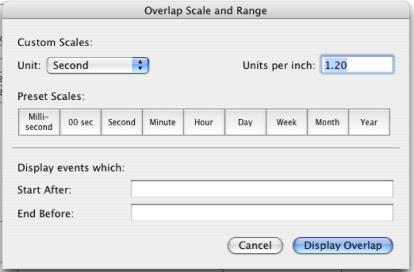
In the Overlap Scale and Range panel select the scale for the Overlap view from the Presets, or create a Custom scale. The scale can be modified if the display needs to be changed.
To crete a Custom scale,- select the units for the scale.
- Select the units per inch to display in the Time Bar.
NOTE: The kind of units depends on the total duration of the EBs being displayed, and the size of the display desired. The number of units per inch should produce EBs no less than 3/4" and preferable over 1" long.
NOTE: If the scale produces a display that exceeds the capacity of the application, the following warning appears:

- Go to next step in this Panel.
View>Overlap View:
- Edit begin date+begin time to redefine left boundary of Overlap View.
- Edit end date+end time to redefine right boundary of Overlap View
- Click on close button to close panel. Overlap display appears.
if the Scale selected results in EBs that are too short, to increase the length of the EBs,
- select Tools>Overlap Scale and Range Panel
- in the Custom section, select the Units you wish to use
- decrease the number in the Units per Inch entry
- press return to view changed display.
- increase or decrease number in Units per Inch entry until display satisfies needs.
- close Overlap Scale and Range panel.
- increase the number in the Units per Inch entry
- press return to view changed display
- increase or decrease number in Units per Inch entry until display satisfies needs.
- close Overlap Scale and Range panel when adjustments are complete.
- While in the Overlap View, select View>Zoom In to increase or Zoom Out to decrease the scale of the date/time shown in the Time Bar.
- Edit displayed data by selecting text to edit in an EB, and changing text.
After determining from data or by logical reasoning or from simulations that one or more of the EB Begin or End Date/Time values should be changed,
- Drag the left border of the EB to the desired Begin Date and Time using the Time Bar markings as guidance.
- Observe the new Begin Date and Time in the EB, and adjust as needed.
- Drag the right border of the EB to the desired End Date and Time.
- Observe the new End Date and Time in the EB, and adjust as needed.
NOTE: Any changes in the Date and Time are displayed in both the Matrix and Overlap views.
- Reposition adjusted EB along actor row as dictated by data or logic.
- Save changes.
Select View>Matrix View to display the EBs in the Matrix View.